# Linux
# Docker
# Updating container using docker-compose
- docker compose pull
- docker compose up -d --remove-orphans
- docker image prune
To list all containers:
- `docker ps -a`
# Setting up Apache Guacamole using Docker
Visit: [https://github.com/boschkundendienst/guacamole-docker-compose](https://github.com/boschkundendienst/guacamole-docker-compose)
Follow instructions which in short are:
1. git clone "https://github.com/boschkundendienst/guacamole-docker-compose.git"
2. cd guacamole-docker-compose
3. Edit docker-compose.yml to suite your environment
4. ./prepare.sh
5. docker compose up -d
If you want to add TOTP then do the following:
1. In your docker-compose.yml file add
- Environment variable: GUACAMOLE\_HOME=/config/guacamole
- Mount ./guacamole:/config/guacamole
2. Create in your docker directory
- create the folllowing folders guacamole/extensions/
- wget [https://downloads.apache.org/guacamole/1.6.0/binary/guacamole-auth-totp-1.6.0.tar.gz](https://downloads.apache.org/guacamole/1.6.0/binary/guacamole-auth-totp-1.6.0.tar.gz) (or matching version to your guacamole install) and extract the guacamole-auth-totp-1.6.0.jar to the above extensions folder
After adding the above extension, restart the container.
# Troubleshooting Docker
**Check Environment Variables Inside the Container:**
```bash
sudo docker exec -it container-name env
```
**Review Logs:**
```bash
sudo docker logs container-name
```
```bash
sudo docker-compose up -d && sudo docker-compose logs -f
```
# Paperless: ProtonMail Bridge
Source code: [shenxn/protonmail-bridge-docker: ProtonMail IMAP/SMTP Bridge Docker container (github.com)](https://github.com/shenxn/protonmail-bridge-docker)
Change to the Paperless docker directory
```bash
sudo docker compose down
sudo docker run --rm -it -v protonmail:/root shenxn/protonmail-bridge init
```
Enter "login" to connect the ProtonMail account. Once complete, type "info" to get the login details that will be used in the Paperless mail interface.
Exit the instance (using control-c if necessary).
Bring paperless up again.
```bash
sudo docker compose up -d
```
Configure and test the mail settings
[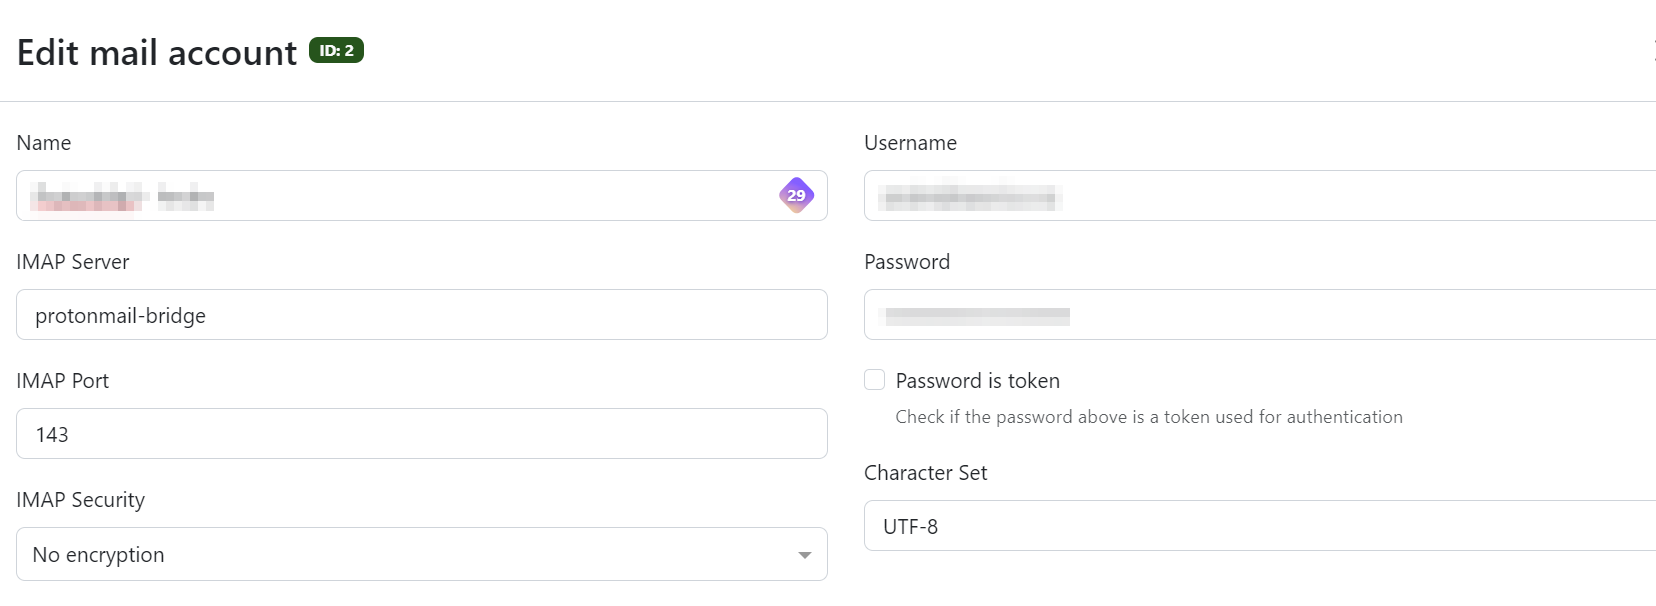](https://mynotes.internetlinked.com/uploads/images/gallery/2024-05/image.png)
# Your URLS
```bash
version: '3.1'
services:
yourls:
image: yourls
restart: always
ports:
- 8080:80
volumes:
- /home/sysadmin/yourls:/var/www/html
environment:
YOURLS_DB_PASS: dbpwd
YOURLS_SITE: https://192.168.20.40:8080/
YOURLS_USER: osgadmin
YOURLS_PASS: yourlspwd
mysql:
image: mysql
restart: always
environment:
MYSQL_ROOT_PASSWORD: dbpwd
MYSQL_DATABASE: yourls
```
# Cloudflare
```bash
version: "3.9"
services:
tunnel:
container_name: cloudflared-tunnel
image: cloudflare/cloudflared
restart: unless-stopped
command: tunnel run
environment:
- TUNNEL_TOKEN=token................
```
# Updating a docker container running on QNAP using SSH
SSH enabled on your QNAP NAS
### 1. Identify the Container and Image Name
### Option A: Using Container Station GUI
1. Open **Container Station**.
2. Navigate to the **Containers** tab.
3. Click on the target container to view details.
4. Locate the **Image** field — this is the image used (e.g., `linuxserver/nextcloud:latest`).
#### Option B: Using SSH
`ssh admin@docker ps`
Copy the container name (e.g., `nextcloud`) and run:
`docker inspect --format='{{.Config.Image}}'`
This returns the image name, e.g.:
`linuxserver/nextcloud:latest`
---
### 2. Back Up Container Volumes (Optional but Recommended)
Check volume mappings:
`docker inspect | grep -A 10 "Mounts"`
Back up the volume path if necessary. For example, if a volume is mounted to `/share/Container/nextcloud/config`, back that up using QNAP File Station or `rsync`.
---
### 3. Pull the Latest Docker Image
`docker pull `
Example:
`docker pull linuxserver/nextcloud:latest`
---
### 4. Stop and Remove the Old Container
`docker stop docker rm`
Example:
`docker stop nextclouddocker rm nextcloud`
> ⚠️ This does **not** delete the image or volume data.
---
### 5. Recreate the Container with Same Settings
### Get Existing Settings (Ports, Volumes, Env Vars)
Use:
`docker inspect `
Note the following:
- Port mappings
- Volume mounts
- Environment variables
---
#### Re-run the Container
Example:
> Replace volume paths, ports, and environment variables based on what you had before.
---
### 6. Verify Everything Works
- Use:
`docker ps`
to confirm the container is running.
- Check logs:
`docker logs -f `
- Access the app via web browser or API to confirm it’s working.
---
### 7. (Optional) Remove Old Images
List unused images:
`docker images`
Clean up dangling images:
`docker image prune`
Or remove a specific old image manually:
`docker rmi `
---
##### Bonus: Automatically Extract and Re-run a Container
To automatically generate a `docker run` command:
`docker run --rm \ -v /var/run/docker.sock:/var/run/docker.sock \ red5d/docker-autocompose > recreate-container.yml`
Then review or convert the output back into a run command.
# Resyncing ISO location on XCP-NG server
- List sources: xe sr-list type=iso
- Resync/scan for ISOs: xe sr-scan uuid=29c2e9f4-6157-17b4-d176-3a87337ae08b
- List DVDs: xe cd-list
# Managing Disks and Space
**Disk Info**
df -h : displays the information of device name, total blocks, total disk space, used disk space, available disk space and mount points on a file system (-h displays output in readable format).
sudo du -mxsh \* | sort -n : The du command summarises the disk usage of each file.
mount | grep root : displays mount points with "root" in them
sudo pvdisplay : display attributes of a physical volume
sudo lvdisplay : display attributes of a logical volume
**Disk restructuring & resizing (LVM)**
- sudo lvremove /dev/fedora\_baselmania/home
- sudo lvextend -L+90G /dev/fedora\_baselmania/root
- sudo resize2fs /dev/mapper/fedora\_baselmania-root
**Other**
sudo yum clean all : cleans cache
# How to batch-resize images using ImageMagick
open terminal and cd into the directory containing your photos and execute below command
```
mkdir photos-Optimized;for photos in *.JPG;do convert -verbose "$photos" -quality 85% -resize 1600x900 ./photos-Optimi
```
Voila! Now you have successfully batch resized/compressed images, You can see the optimized images in the photos-Optimized directory.
Taken from [https://linuxsuperuser.com/batch-resize-compress-photos-linux/](https://linuxsuperuser.com/batch-resize-compress-photos-linux/)
# How to find a file containing a particular text string
Search all subfirectories recursively
```xml
grep -r "redeem reward" /home/tom/
```
To display only fines names, add -H option, or
```xml
$ grep -H -R vivek /etc/* | cut -d: -f1
```
To ignore case, add -i option.
# How do I set permissions on all directories and files on a Linux system?
To change all the directories to 755 (`drwxr-xr-x`):
```bash
find /opt/lampp/htdocs -type d -exec chmod 755 {} \;
```
To change all the files to 644 (`-rw-r--r--`):
```bash
find /opt/lampp/htdocs -type f -exec chmod 644 {} \;
```
# How do you use (run/install) an AppImage?
AppImages do not need to be installed. They are a self-contained app that simply needs to be made executable and then run.
As nothing is actually installed, it is good idea to move the downloaded APPIMAGE file to a folder of your choice before creating any shortcut link to it. For my Fedora install I use /usr/local/share/filename-directory. If necessary I will also save the shortcut image here.
Download the AppImage and then make it exscutable as follows:
```xml
$ chmod a+x Filename.AppImage
```
Now run the application as follows:
```xml
$ ./Filename.AppImage
```
When first run, some AppImage applications will ask if a desktop shortcut should be created.
If a shortcut is not created, this can be done manaually using your text editor of choice. In my Fedora install this is done here: ~/.local/share/applications/
# Connecting Ubuntu Desktop 22.04 to a Meraki VPN
Add repository for installing network-manager-l2tp
```
sudo add-apt-repository ppa:nm-l2tp/network-manager-l2tp
sudo apt-get update
```
Install network-manager-l2tp
```
sudo apt-get install network-manager-l2tp
sudo apt-get install network-manager-l2tp-gnome
```
Configure the network
- Go to Settings > Network.
- Press the + to add a VPN
- Select “Layer 2 Tunneling Protocol”
- Add Gateway, and username and password (optional).
- Click “IPsec Settings…”
- “Enable IPsec tunnel to L2TP host”
- Add your preshared key.
- Set Phase1 Algorithms to “3des-sha1-modp1024”
- Set Phase2 Algorithms to “3des-sha1”
- “Enforce UDP capsulation” are activated.
- Everything else should be unticked.
- Apply the settings
Turn off the xl2tpd service
```
sudo systemctl stop xl2tpd
```
and prevent it from starting again on reboot
```
sudo systemctl disable xl2tpd.
```
You should now be able to connect to the VPN.
# Changing VM disk size
Change the size in XoA.
Run lsblk to check it is there.
Boot to GParted and resize partition.
Then
- sudo lvextend -l +100%FREE /dev/mapper/ubuntu--vg-ubuntu--lv
- sudo resize2fs /dev/mapper/ubuntu--vg-ubuntu--lv
# Kiosk Machine
This is a work in progress i.e. I am starting with a locked-down account and working towards a final kiosk deployment.
Two scripts will be created in the process and can be stored in /usr/local/bin.
I am trying to achieve this using PoPOS! with Firefox as the default browser, using duckduckgo as the start-up page and default search engine. The duckduckgo Firefox extension is also installed.
Create a script to run Firefox in full screen mode, opening duckduckgo's homepage in private mode.
I also set the Firefox settings so that no passwords are saved and everything is cleared on exit.
```bash
#!/bin/bash
firefox -private-window "https://www.duckduckgo.com" &
while ! xdotool search --onlyvisible --class "firefox"; do
sleep 1
done
xdotool key F11 #xdotool needs to ne installed for this to work
```
To run the script at login, login as the default user, press Alt + F2 and run gnome-session-properties.
Click on “Add”, name browse to the script and save.
Have the laptop reboot every 10min
```bash
#!/bin/bash
# Wait for keyboard or mouse activity - I still need to try this
inotifywait -e modify /dev/input/event* & #install inotify-tools
# Idle time in milliseconds (10 minutes)
IDLE_TIME=$((10 * 60 * 1000))
while true; do
idle=$(xprintidle)
if [ "$idle" -ge "$IDLE_TIME" ]; then
shutdown -r
fi
sleep 60
done
```
Also make this script to run at login using gnome-session-properties.
Both the above scripts need to be made executable.
```
chmod +x filename.sh
```
Using OverlayRoot any changes will be lost when the system reboots.
```
sudo apt-get install overlayroot
```
then
```
sudo nano /etc/overlayroot.conf
```
and add
```
overlayroot="tmpfs"
```
Now reboot.
To disable overlayroot, comment out the above line
```bash
#overlayroot="tmpfs"
```
and then run
```
sudo update-initramfs -u
```
Now reboot
# XenOrchestra Update
Change to the XenOrchestraInstallerUpdater dirctory and run
```
sudo ./xo-install.sh --update
```
# Managing Login Sessions
List sessions
```
loginctl list-sessions
```
Kill a session
```
loginctl terminate-session
```
Lock session
```
loginctl lock-session
```