Linux
- Docker
- Updating container using docker-compose
- Setting up Apache Guacamole using Docker
- Troubleshooting Docker
- Paperless: ProtonMail Bridge
- Your URLS
- Cloudflare
- Updating a docker container running on QNAP using SSH
- Resyncing ISO location on XCP-NG server
- Managing Disks and Space
- How to batch-resize images using ImageMagick
- How to find a file containing a particular text string
- How do I set permissions on all directories and files on a Linux system?
- How do you use (run/install) an AppImage?
- Connecting Ubuntu Desktop 22.04 to a Meraki VPN
- Changing VM disk size
- Kiosk Machine
- XenOrchestra Update
- Managing Login Sessions
Docker
Updating container using docker-compose
- docker compose pull
- docker compose up -d --remove-orphans
- docker image prune
To list all containers:
docker ps -a
Setting up Apache Guacamole using Docker
Visit: https://github.com/boschkundendienst/guacamole-docker-compose
Follow instructions which in short are:
- git clone "https://github.com/boschkundendienst/guacamole-docker-compose.git"
- cd guacamole-docker-compose
- Edit docker-compose.yml to suite your environment
- ./prepare.sh
- docker compose up -d
If you want to add TOTP then do the following:
- In your docker-compose.yml file add
- Environment variable: GUACAMOLE_HOME=/config/guacamole
- Mount ./guacamole:/config/guacamole
- Create in your docker directory
- create the folllowing folders guacamole/extensions/
- wget https://downloads.apache.org/guacamole/1.6.0/binary/guacamole-auth-totp-1.6.0.tar.gz (or matching version to your guacamole install) and extract the guacamole-auth-totp-1.6.0.jar to the above extensions folder
After adding the above extension, restart the container.
Troubleshooting Docker
Check Environment Variables Inside the Container:
sudo docker exec -it container-name envReview Logs:
sudo docker logs container-namesudo docker-compose up -d && sudo docker-compose logs -f
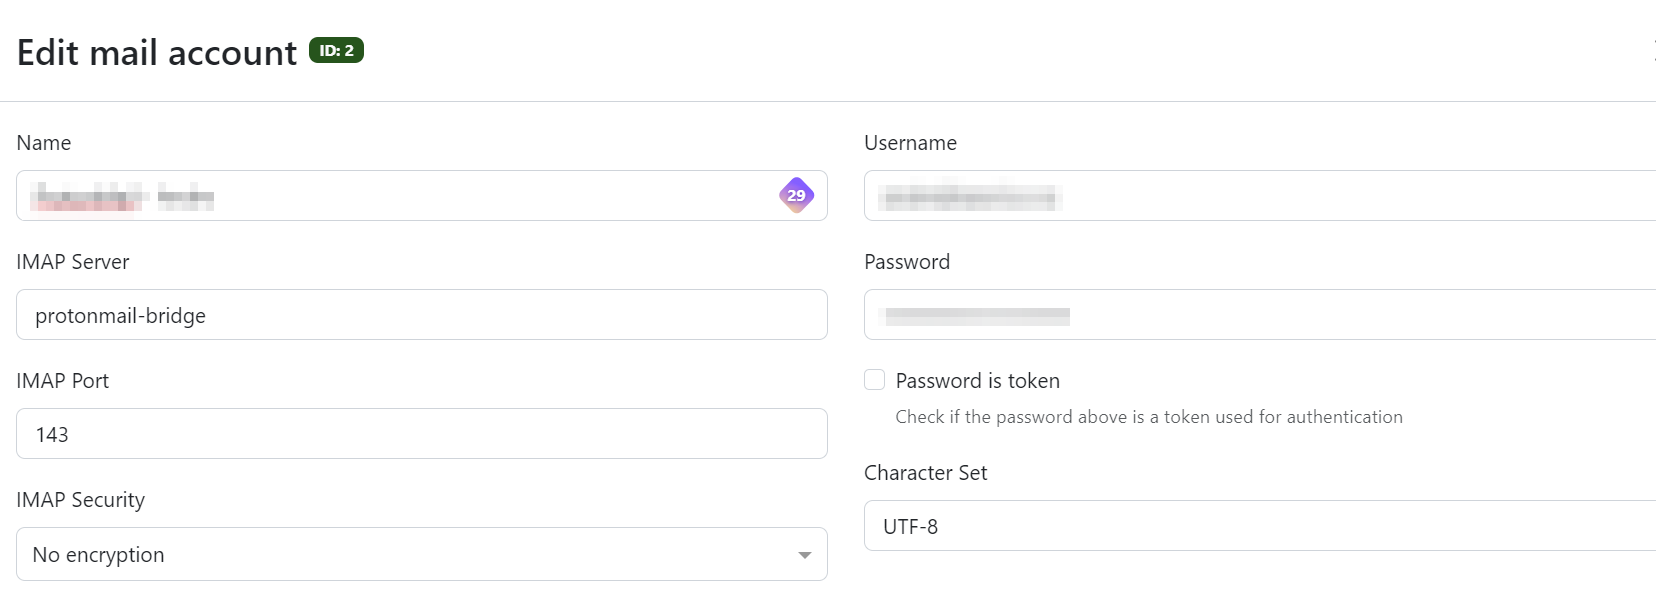
Paperless: ProtonMail Bridge
Source code: shenxn/protonmail-bridge-docker: ProtonMail IMAP/SMTP Bridge Docker container (github.com)
Change to the Paperless docker directory
sudo docker compose down
sudo docker run --rm -it -v protonmail:/root shenxn/protonmail-bridge init
Enter "login" to connect the ProtonMail account. Once complete, type "info" to get the login details that will be used in the Paperless mail interface.
Exit the instance (using control-c if necessary).
Bring paperless up again.
sudo docker compose up -dConfigure and test the mail settings
Your URLS
version: '3.1'

services:

  yourls:
    image: yourls
    restart: always
    ports:
      - 8080:80
    volumes:
      - /home/sysadmin/yourls:/var/www/html
    environment:
      YOURLS_DB_PASS: dbpwd
      YOURLS_SITE: https://192.168.20.40:8080/
      YOURLS_USER: osgadmin
      YOURLS_PASS: yourlspwd

  mysql:
    image: mysql
    restart: always
    environment:
      MYSQL_ROOT_PASSWORD: dbpwd
MYSQL_DATABASE: yourlsCloudflare
version: "3.9"
services:

  tunnel:
    container_name: cloudflared-tunnel
    image: cloudflare/cloudflared
    restart: unless-stopped
    command: tunnel run
    environment:
- TUNNEL_TOKEN=token................Updating a docker container running on QNAP using SSH
SSH enabled on your QNAP NAS
1. Identify the Container and Image Name
Option A: Using Container Station GUI
-
Open Container Station.
-
Navigate to the Containers tab.
-
Click on the target container to view details.
-
Locate the Image field — this is the image used (e.g.,
linuxserver/nextcloud:latest).
Option B: Using SSH
Copy the container name (e.g., nextcloud) and run:
This returns the image name, e.g.:
2. Back Up Container Volumes (Optional but Recommended)
Check volume mappings:
Back up the volume path if necessary. For example, if a volume is mounted to /share/Container/nextcloud/config, back that up using QNAP File Station or rsync.
3. Pull the Latest Docker Image
Example:
4. Stop and Remove the Old Container
Example:
⚠️ This does not delete the image or volume data.
5. Recreate the Container with Same Settings
Get Existing Settings (Ports, Volumes, Env Vars)
Use:
Note the following:
-
Port mappings
-
Volume mounts
-
Environment variables
Re-run the Container
Example:
Replace volume paths, ports, and environment variables based on what you had before.
6. Verify Everything Works
-
Use:
to confirm the container is running.
-
Check logs:
-
Access the app via web browser or API to confirm it’s working.
7. (Optional) Remove Old Images
List unused images:
Clean up dangling images:
Or remove a specific old image manually:
Bonus: Automatically Extract and Re-run a Container
To automatically generate a docker run command:
Then review or convert the output back into a run command.
Resyncing ISO location on XCP-NG server
- List sources: xe sr-list type=iso
- Resync/scan for ISOs: xe sr-scan uuid=29c2e9f4-6157-17b4-d176-3a87337ae08b
- List DVDs: xe cd-list
Managing Disks and Space
Disk Info
df -h : displays the information of device name, total blocks, total disk space, used disk space, available disk space and mount points on a file system (-h displays output in readable format).
sudo du -mxsh * | sort -n : The du command summarises the disk usage of each file.
mount | grep root : displays mount points with "root" in them
sudo pvdisplay : display attributes of a physical volume
sudo lvdisplay : display attributes of a logical volume
Disk restructuring & resizing (LVM)
- sudo lvremove /dev/fedora_baselmania/home
- sudo lvextend -L+90G /dev/fedora_baselmania/root
- sudo resize2fs /dev/mapper/fedora_baselmania-root
Other
sudo yum clean all : cleans cache
How to batch-resize images using ImageMagick
open terminal and cd into the directory containing your photos and execute below command
mkdir photos-Optimized;for photos in *.JPG;do convert -verbose "$photos" -quality 85% -resize 1600x900 ./photos-OptimiVoila! Now you have successfully batch resized/compressed images, You can see the optimized images in the photos-Optimized directory.
Taken from https://linuxsuperuser.com/batch-resize-compress-photos-linux/
How to find a file containing a particular text string
Search all subfirectories recursively
grep -r "redeem reward" /home/tom/To display only fines names, add -H option, or
$ grep -H -R vivek /etc/* | cut -d: -f1To ignore case, add -i option.
How do I set permissions on all directories and files on a Linux system?
To change all the directories to 755 (drwxr-xr-x):
find /opt/lampp/htdocs -type d -exec chmod 755 {} \;To change all the files to 644 (-rw-r--r--):
find /opt/lampp/htdocs -type f -exec chmod 644 {} \;How do you use (run/install) an AppImage?
AppImages do not need to be installed. They are a self-contained app that simply needs to be made executable and then run.
As nothing is actually installed, it is good idea to move the downloaded APPIMAGE file to a folder of your choice before creating any shortcut link to it. For my Fedora install I use /usr/local/share/filename-directory. If necessary I will also save the shortcut image here.
Download the AppImage and then make it exscutable as follows:
$ chmod a+x Filename.AppImageNow run the application as follows:
$ ./Filename.AppImageWhen first run, some AppImage applications will ask if a desktop shortcut should be created.
If a shortcut is not created, this can be done manaually using your text editor of choice. In my Fedora install this is done here: ~/.local/share/applications/
Connecting Ubuntu Desktop 22.04 to a Meraki VPN
Add repository for installing network-manager-l2tp
sudo add-apt-repository ppa:nm-l2tp/network-manager-l2tp
sudo apt-get update
Install network-manager-l2tp
sudo apt-get install network-manager-l2tp
sudo apt-get install network-manager-l2tp-gnome
Configure the network
- Go to Settings > Network.
- Press the + to add a VPN
- Select “Layer 2 Tunneling Protocol”
- Add Gateway, and username and password (optional).
- Click “IPsec Settings…”
- “Enable IPsec tunnel to L2TP host”
- Add your preshared key.
- Set Phase1 Algorithms to “3des-sha1-modp1024”
- Set Phase2 Algorithms to “3des-sha1”
- “Enforce UDP capsulation” are activated.
- Everything else should be unticked.
- Apply the settings
Turn off the xl2tpd service
sudo systemctl stop xl2tpdand prevent it from starting again on reboot
sudo systemctl disable xl2tpd.You should now be able to connect to the VPN.
Changing VM disk size
Change the size in XoA.
Run lsblk to check it is there.
Boot to GParted and resize partition.
Then
- sudo lvextend -l +100%FREE /dev/mapper/ubuntu--vg-ubuntu--lv
- sudo resize2fs /dev/mapper/ubuntu--vg-ubuntu--lv
Kiosk Machine
This is a work in progress i.e. I am starting with a locked-down account and working towards a final kiosk deployment.
Two scripts will be created in the process and can be stored in /usr/local/bin.
I am trying to achieve this using PoPOS! with Firefox as the default browser, using duckduckgo as the start-up page and default search engine. The duckduckgo Firefox extension is also installed.
Create a script to run Firefox in full screen mode, opening duckduckgo's homepage in private mode.
I also set the Firefox settings so that no passwords are saved and everything is cleared on exit.
#!/bin/bash
firefox -private-window  "https://www.duckduckgo.com" &
while ! xdotool search --onlyvisible --class "firefox"; do
    sleep 1
done
xdotool key F11 #xdotool needs to ne installed for this to work
To run the script at login, login as the default user, press Alt + F2 and run gnome-session-properties.
Click on “Add”, name browse to the script and save.
Have the laptop reboot every 10min
#!/bin/bash

# Wait for keyboard or mouse activity - I still need to try this
inotifywait -e modify /dev/input/event* & #install inotify-tools

# Idle time in milliseconds (10 minutes)
IDLE_TIME=$((10 * 60 * 1000))

while true; do
    idle=$(xprintidle)
    if [ "$idle" -ge "$IDLE_TIME" ]; then
        shutdown -r
    fi
    sleep 60
done
Also make this script to run at login using gnome-session-properties.
Both the above scripts need to be made executable.
chmod +x filename.shUsing OverlayRoot any changes will be lost when the system reboots.
sudo apt-get install overlayrootthen
sudo nano /etc/overlayroot.confand add
overlayroot="tmpfs"Now reboot.
To disable overlayroot, comment out the above line
#overlayroot="tmpfs"and then run
sudo update-initramfs -uNow reboot
XenOrchestra Update
Change to the XenOrchestraInstallerUpdater dirctory and run
sudo ./xo-install.sh --update
Managing Login Sessions
List sessions
loginctl list-sessionsKill a session
loginctl terminate-session <session>Lock session
loginctl lock-session