# Docker

# Updating container using docker-compose

- docker compose pull
- docker compose up -d --remove-orphans
- docker image prune

To list all containers:

- `docker ps -a`

# Setting up Apache Guacamole using Docker

Visit: [https://github.com/boschkundendienst/guacamole-docker-compose](https://github.com/boschkundendienst/guacamole-docker-compose)

Follow instructions which in short are:

1. git clone "https://github.com/boschkundendienst/guacamole-docker-compose.git"
2. cd guacamole-docker-compose
3. Edit docker-compose.yml to suite your environment
4. ./prepare.sh
5. docker compose up -d

If you want to add TOTP then do the following:

1. In your docker-compose.yml file add 
    - Environment variable: GUACAMOLE\_HOME=/config/guacamole
    - Mount ./guacamole:/config/guacamole
2. Create in your docker directory 
    - create the folllowing folders guacamole/extensions/
    - wget [https://downloads.apache.org/guacamole/1.6.0/binary/guacamole-auth-totp-1.6.0.tar.gz](https://downloads.apache.org/guacamole/1.6.0/binary/guacamole-auth-totp-1.6.0.tar.gz) (or matching version to your guacamole install) and extract the guacamole-auth-totp-1.6.0.jar to the above extensions folder

After adding the above extension, restart the container.

# Troubleshooting Docker

**Check Environment Variables Inside the Container:**

```bash
sudo docker exec -it container-name env
```

**Review Logs:**

```bash
sudo docker logs container-name
```

```bash
sudo docker-compose up -d && sudo docker-compose logs -f
```

# Paperless: ProtonMail Bridge

Source code: [shenxn/protonmail-bridge-docker: ProtonMail IMAP/SMTP Bridge Docker container (github.com)](https://github.com/shenxn/protonmail-bridge-docker)

Change to the Paperless docker directory

```bash
sudo docker compose down
sudo docker run --rm -it -v protonmail:/root shenxn/protonmail-bridge init
```

Enter "login" to connect the ProtonMail account. Once complete, type "info" to get the login details that will be used in the Paperless mail interface.

Exit the instance (using control-c if necessary).

Bring paperless up again.

```bash
sudo docker compose up -d
```

Configure and test the mail settings

[![image.png](https://mynotes.internetlinked.com/uploads/images/gallery/2024-05/scaled-1680-/image.png)
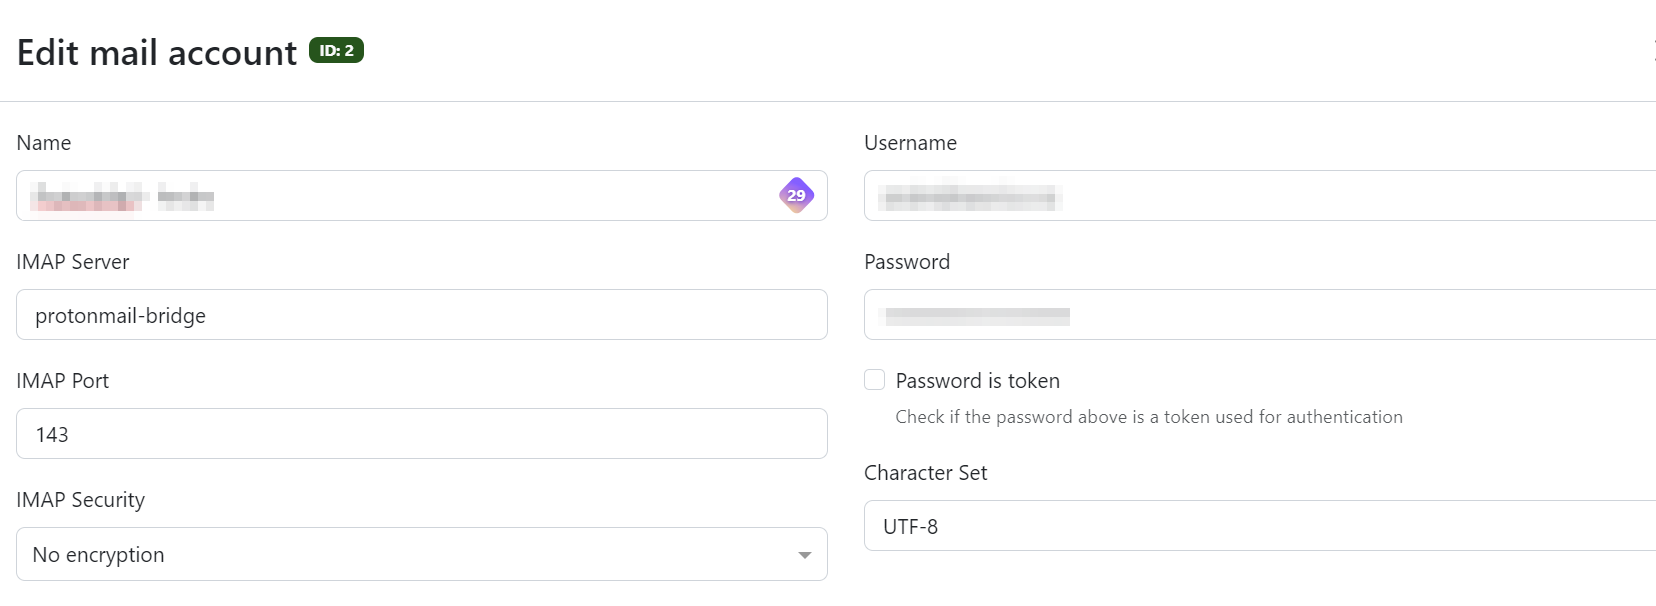
](https://mynotes.internetlinked.com/uploads/images/gallery/2024-05/image.png)

# Your URLS

```bash
version: '3.1'

services:

  yourls:
    image: yourls
    restart: always
    ports:
      - 8080:80
    volumes:
      - /home/sysadmin/yourls:/var/www/html
    environment:
      YOURLS_DB_PASS: dbpwd
      YOURLS_SITE: https://192.168.20.40:8080/
      YOURLS_USER: osgadmin
      YOURLS_PASS: yourlspwd

  mysql:
    image: mysql
    restart: always
    environment:
      MYSQL_ROOT_PASSWORD: dbpwd
      MYSQL_DATABASE: yourls
```

# Cloudflare

```bash
version: "3.9"
services:

  tunnel:
    container_name: cloudflared-tunnel
    image: cloudflare/cloudflared
    restart: unless-stopped
    command: tunnel run
    environment:
      - TUNNEL_TOKEN=token................
```

# Updating a docker container running on QNAP using SSH

SSH enabled on your QNAP NAS

### 1. Identify the Container and Image Name

### Option A: Using Container Station GUI

1. Open **Container Station**.
2. Navigate to the **Containers** tab.
3. Click on the target container to view details.
4. Locate the **Image** field — this is the image used (e.g., `linuxserver/nextcloud:latest`).

#### Option B: Using SSH

<div class="contain-inline-size rounded-md border-[0.5px] border-token-border-medium relative bg-token-sidebar-surface-primary" id="bkmrk-ssh-admin%40%3Cyour-nas-"><div class="overflow-y-auto p-4" dir="ltr">`ssh admin@<your-nas-ip>docker ps`</div></div>Copy the container name (e.g., `nextcloud`) and run:

<div class="contain-inline-size rounded-md border-[0.5px] border-token-border-medium relative bg-token-sidebar-surface-primary" id="bkmrk-docker-inspect---for"><div class="overflow-y-auto p-4" dir="ltr">`docker inspect --format=<span class="hljs-string">'{{.Config.Image}}'</span> <container-name>`</div></div>This returns the image name, e.g.:

<div class="contain-inline-size rounded-md border-[0.5px] border-token-border-medium relative bg-token-sidebar-surface-primary" id="bkmrk-linuxserver%2Fnextclou"><div class="overflow-y-auto p-4" dir="ltr">`linuxserver/nextcloud:latest`</div></div>---

### 2. Back Up Container Volumes (Optional but Recommended)

Check volume mappings:

<div class="contain-inline-size rounded-md border-[0.5px] border-token-border-medium relative bg-token-sidebar-surface-primary" id="bkmrk-docker-inspect-%3Ccont"><div class="overflow-y-auto p-4" dir="ltr">`docker inspect <container-name> | grep -A 10 <span class="hljs-string">"Mounts"</span>`</div></div>Back up the volume path if necessary. For example, if a volume is mounted to `/share/Container/nextcloud/config`, back that up using QNAP File Station or `rsync`.

---

### 3. Pull the Latest Docker Image

<div class="contain-inline-size rounded-md border-[0.5px] border-token-border-medium relative bg-token-sidebar-surface-primary" id="bkmrk-docker-pull-%3Cimage-n"><div class="overflow-y-auto p-4" dir="ltr">`docker pull <image-name>`</div></div>Example:

<div class="contain-inline-size rounded-md border-[0.5px] border-token-border-medium relative bg-token-sidebar-surface-primary" id="bkmrk-docker-pull-linuxser"><div class="overflow-y-auto p-4" dir="ltr">`docker pull linuxserver/nextcloud:latest`</div></div>---

### 4. Stop and Remove the Old Container

<div class="contain-inline-size rounded-md border-[0.5px] border-token-border-medium relative bg-token-sidebar-surface-primary" id="bkmrk-docker-stop-%3Ccontain"><div class="overflow-y-auto p-4" dir="ltr">`docker stop <container-name>docker <span class="hljs-built_in">rm</span> <container-name>`</div></div>Example:<button class="flex items-center gap-1 px-4 py-1 select-none"></button>

<div class="contain-inline-size rounded-md border-[0.5px] border-token-border-medium relative bg-token-sidebar-surface-primary" id="bkmrk-docker-stop-nextclou"><div class="overflow-y-auto p-4" dir="ltr">`docker stop nextclouddocker <span class="hljs-built_in">rm</span> nextcloud`</div></div>> ⚠️ This does **not** delete the image or volume data.

---

### 5. Recreate the Container with Same Settings

### Get Existing Settings (Ports, Volumes, Env Vars)

Use:

<div class="contain-inline-size rounded-md border-[0.5px] border-token-border-medium relative bg-token-sidebar-surface-primary" id="bkmrk-docker-inspect-%3Ccont-1"><div class="overflow-y-auto p-4" dir="ltr">`docker inspect <container-name>`</div></div>Note the following:

- Port mappings
- Volume mounts
- Environment variables

---

#### Re-run the Container

Example:

<div class="contain-inline-size rounded-md border-[0.5px] border-token-border-medium relative bg-token-sidebar-surface-primary" id="bkmrk-docker-run--d-%5C---na"><div class="overflow-y-auto p-4" dir="ltr">`docker run -d \  --name nextcloud \  -e PUID=1000 \  -e PGID=1000 \  -e TZ=Europe/London \  -p 8080:80 \  -v /share/Container/nextcloud/config:/config \  -v /share/Container/nextcloud/data:/data \  linuxserver/nextcloud:latest`</div></div>> Replace volume paths, ports, and environment variables based on what you had before.

---

### 6. Verify Everything Works

- Use:
    
    <div class="contain-inline-size rounded-md border-[0.5px] border-token-border-medium relative bg-token-sidebar-surface-primary"><div class="sticky top-9"></div><div class="overflow-y-auto p-4" dir="ltr">`docker ps`</div></div>to confirm the container is running.
- Check logs:
    
    <div class="contain-inline-size rounded-md border-[0.5px] border-token-border-medium relative bg-token-sidebar-surface-primary"><div class="sticky top-9"></div><div class="overflow-y-auto p-4" dir="ltr">`docker logs -f <container-name>`</div></div>
- Access the app via web browser or API to confirm it’s working.

---

### 7. (Optional) Remove Old Images

List unused images:

<div class="contain-inline-size rounded-md border-[0.5px] border-token-border-medium relative bg-token-sidebar-surface-primary" id="bkmrk-docker-images"><div class="overflow-y-auto p-4" dir="ltr">`docker images`</div></div>Clean up dangling images:

<div class="contain-inline-size rounded-md border-[0.5px] border-token-border-medium relative bg-token-sidebar-surface-primary" id="bkmrk-docker-image-prune"><div class="overflow-y-auto p-4" dir="ltr">`docker image prune`</div></div>Or remove a specific old image manually:

<div class="contain-inline-size rounded-md border-[0.5px] border-token-border-medium relative bg-token-sidebar-surface-primary" id="bkmrk-docker-rmi-%3Cimage-id"><div class="overflow-y-auto p-4" dir="ltr">`docker rmi <image-id>`</div></div>---

##### Bonus: Automatically Extract and Re-run a Container

To automatically generate a `docker run` command:

<div class="contain-inline-size rounded-md border-[0.5px] border-token-border-medium relative bg-token-sidebar-surface-primary" id="bkmrk-docker-run---rm-%5C--v"><div class="overflow-y-auto p-4" dir="ltr">`docker run --<span class="hljs-built_in">rm</span> \  -v /var/run/docker.sock:/var/run/docker.sock \  red5d/docker-autocompose <container-name> > recreate-container.yml`</div></div>Then review or convert the output back into a run command.